RV Generator Exhaust Venting System 44461 Review
RV Generator Exhaust Venting System 44461 Review
Are you looking for a simple way to redirect your RV generator exhaust so you and your passengers don’t have to breathe fumes at ground level?


Product snapshot: what this is and why it matters
You’re looking at the RV Generator Exhaust Venting System 44461 Fit for Most RV Generator Exhaust Systems, Direct the Generator Exhaust Above the RV Roof to manage exhaust discharge from a cramped generator area. This product is built to move exhaust upward and away from the sides and ground level, reduce generator noise, and lower the chance of fumes being pulled into living areas — but you should still use carbon monoxide detectors and follow exhaust clearances.
Key features at a glance
You’ll find this unit marketed with a clear part number (44461) and a few practical claims: it fits most RV exhaust systems, reduces generator noise, and helps transfer exhaust gases from ground level to the roof. Installation is advertised as simple and tool-free, with no electrical connection required.
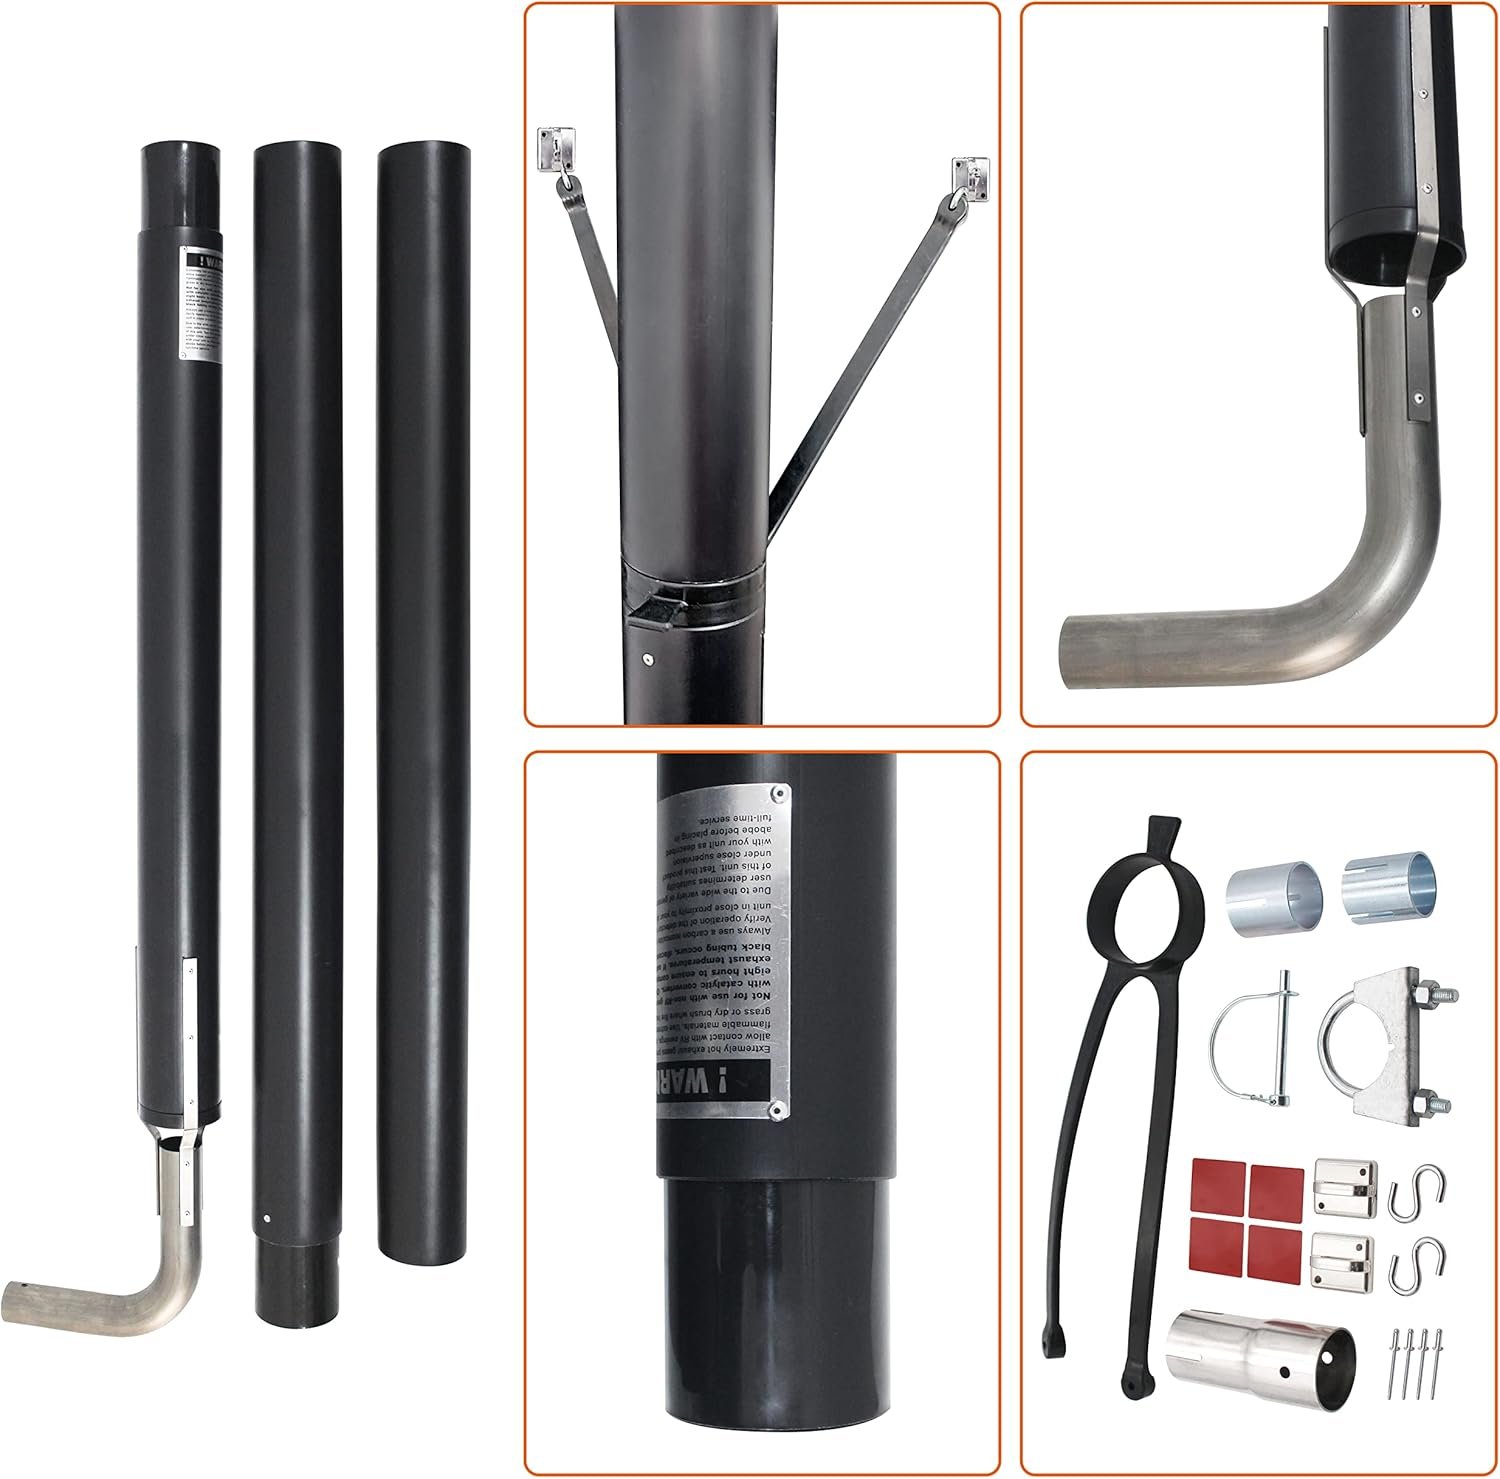
What’s included in the package
You’ll typically receive the exhaust venting pipe/extension and any clamps or adapters shown in the product listing; exact contents can vary by seller. If you want certainty, check the seller’s product page or ask them to confirm what comes in the box before buying.
Specifications and quick reference table
You’ll appreciate a single place to check the main specs and claims. The table below lists the most important details so you can quickly confirm fit and performance expectations.
| Feature | Details |
|---|---|
| Product name | RV Generator Exhaust Venting System 44461 Fit for Most RV Generator Exhaust Systems, Direct the Generator Exhaust Above the RV Roof |
| Part number | 44461 |
| Compatibility | Fits most RV generator exhaust systems (verify outlet size and orientation before buying) |
| Function | Redirects exhaust upward above the roofline; reduces perceived noise |
| Installation | Described as simple; advertised tool-free and no electrical connection required |
| Safety claims | Helps transfer exhaust gases away from ground level to reduce inhalation risk (use with CO detectors and proper clearances) |
| Materials | Typically metal/heat-resistant metal alloy with clamps/adapters (confirm with seller) |
| Intended users | RV owners who want to move exhaust away from living areas and reduce noise |
| Typical advantages | Easier campsite living, reduced fumes near slides/doors, quieter operation |
| Maintenance | Occasional checks for corrosion, clamp tightness, and sealing |

First impressions when you unpack it
When you first handle this product, you’ll notice it’s designed to be practical rather than decorative. The fit and finish usually prioritize heat resistance and a tight fit over aesthetics, which is exactly what you want for an exhaust accessory.
Build quality and materials
You’ll want components that withstand heat, vibration, and the weather; the RV Generator Exhaust Venting System 44461 is typically made from metal suitable for exhaust use. Expect standard metal adapters and clamps rather than fancy coatings — the goal is durability and safety.
How it fits most RVs
You’ll see “fits most” often, which means the design accommodates common outlet diameters and angles used on many RV generators. That said, you should measure your generator’s exhaust outlet diameter and orientation before ordering to ensure a tight, secure fit.
Installation experience: what to expect
You’ll find the installation process is meant to be accessible for most RV owners, and the claim of “no special tools or power required” is generally accurate for basic mounting. Still, preparation makes installation faster and less stressful.
Tools, time, and prep required
You’ll likely need a ladder, gloves, and possibly a screwdriver or a ratchet if the clamps require tightening beyond hand strength. Plan on 15–45 minutes for a straightforward install if your outlet is standard and unobstructed; more complex setups or roof attachments can add time.
Step-by-step summary of installation
You’ll appreciate a clear path through the steps, so here’s a concise summary that covers the typical approach:
- Measure your generator exhaust outlet and compare to the adapter provided. Confirm the fit before you start.
- Park the RV on level ground and ensure the generator is off and cool. Safety first.
- Place the adapter or extension over the exhaust outlet and seat it securely. The piece should slide on without forcing.
- Tighten any supplied clamps or fasteners until snug; avoid over-tightening metal that could strip threads.
- If the system has a roof-facing extension, guide it so exhaust is directed safely above the roofline, maintaining recommended clearances from vents, air conditioners, and roof edges.
- Do a brief test run with the generator to check for leaks, rattles, and alignment. Re-check connections after a short run.

Performance: how it behaves in real use
You’ll notice two main performance benefits when the system is installed correctly: reduced nuisance at ground level and a drop in perceived noise for people sitting nearby. It’s not a magic silencer for the generator, but it shifts exhaust away from the living zone which often translates into a quieter experience.
Noise reduction and perception
You’ll likely experience a reduction in perceived noise because sound propagates differently when the exhaust is directed upward. The system doesn’t replace a muffler, but moving exhaust above the roof helps lower direct noise exposure for people standing at the side of the RV.
Exhaust direction and safety considerations
You’ll appreciate that the product’s main safety benefit is directing exhaust away from doors, slides, and ground-level vents. However, you must still use CO detectors, maintain adequate clearances, and follow local codes — this system reduces but does not eliminate carbon monoxide hazards.
Fit and compatibility: verifying before purchase
You’ll want to measure your generator’s outlet diameter and the clearance around it, because “fits most” is convenient but not universal. If your outlet has an unusual angle or custom housing, you may need an adapter or a custom approach.
What to measure before ordering
You’ll need to measure the exhaust outlet diameter, the distance from the outlet to nearby obstructions, and roof clearance for the upward-directed pipe. It’s also helpful to note whether the outlet faces straight out, down, or at an angle, as the fit and seal depend on orientation.

Real-world use cases and scenarios
You’ll find real benefits in common RV situations: boondocking, staying at crowded campgrounds, tailgating, and full-time RV living. In each case, moving exhaust upward can dramatically reduce the annoyance of fumes and noise.
Boondocking and remote camping
You’ll be grateful when boondocking that exhaust is directed away from your campsite seating areas and cooking zones. Directing exhaust upward helps maintain a more pleasant campsite atmosphere and keeps exhaust fumes from settling into low-lying tent areas.
Staying in RV parks and crowded sites
You’ll notice neighbors are less affected when your exhaust is directed above the roof, which can reduce complaints and allow you to run the generator more comfortably. This is especially helpful when you run the A/C or other accessories during hot evenings.
Pros and cons: clear trade-offs
You’ll appreciate how straightforward the benefits are, but you should also be clear-eyed about limitations. The system is not a full noise-control solution and relies on proper fit and installation to perform safely.
| Pros | Cons |
|---|---|
| Redirects exhaust away from ground level and doors | Doesn’t eliminate exhaust — CO safety still required |
| Reduces perceived noise near the RV | “Fits most” may still need confirmation for some models |
| Simple installation, often tool-free | Metal parts can corrode over time in harsh conditions |
| No electrical connection needed | May require additional adapters for unusual outlets |
Maintenance and expected longevity
You’ll need to do occasional checks for corrosion, loosened clamps, and seal integrity to keep the system functioning well. With routine inspection and proper winter storage, you can expect years of useful service.
Cleaning and routine care
You’ll want to visually inspect the unit after heavy use and periodically wipe away soot and residue from the outer surfaces. Check clamps for tightness and replace any rubber or silicone gaskets that harden or crack over time.
Use in winter and extreme weather
You’ll need to watch for ice buildup and salt corrosion if you travel in winter or coastal areas. If the venting element is exposed on the roof, clear ice and heavy snow before running the generator, and clean off salt deposits after winter trips.
Troubleshooting common issues and quick fixes
You’ll find common problems are usually simple to fix: loose clamps, small leaks, and rattles. Knowing what to look for will save you time and prevent bigger issues.
Common problem: rattling and vibration
You’ll commonly hear rattles from loose clamps or contact with other roof hardware. Re-tighten clamps, add anti-vibration washers, or use high-temp rubber padding between metal surfaces to quiet things down.
Common problem: exhaust smell inside the RV
You’ll immediately check seals if you smell exhaust inside; a misfit or leak at the connection is usually the cause. Park in a safe, well-ventilated area, shut the generator off, and re-seat and tighten the connection before trying the generator again.
Comparison with other exhaust solutions
You’ll want to know how this product stacks up against other options like flexible extenders, custom-fabricated ducts, or OEM-specific kits. This system is a middle-ground solution: more secure and upward-directed than a short flexible pipe, but less tailored than a manufacturer-specific kit.
Alternatives to consider
You’ll see alternatives that include:
- OEM generator vent kits designed specifically for a generator model.
- Flexible stainless-steel extenders that can be bent into place.
- Custom-fabricated roof penetration systems for permanent installations. Each alternative has pros and cons regarding fit, permanence, and price.
Installation tips to get the best result
You’ll want a few practical tips to make installation fast and reliable, since a poor installation undermines both safety and performance. These small steps prevent common installation errors.
Tips for a secure connection
You’ll start by thoroughly cleaning mating surfaces and checking for rust or burrs that could prevent a tight seal. Use high-temperature sealant or gasket material if recommended and don’t force parts together — the correct fit should slide on with moderate pressure.
Tips for minimizing noise and vibration
You’ll get better results by supporting longer runs to reduce resonance and by isolating metal-to-metal contact points with silicone or rubber grommets. If the system vibrates at certain engine speeds, slightly repositioning the outlet or adding a clamp damping pad usually helps.
Safety reminders you must follow
You’ll understand this system reduces the risk of ground-level exhaust exposure but doesn’t replace safety practices. CO detectors, proper clearances, and routine checks are non-negotiable.
Carbon monoxide safety
You’ll always use functional CO detectors near sleeping areas and living spaces whenever the generator runs. Even with exhaust redirected upward, wind and site-specific airflow can still carry fumes back toward your RV.
Roof and clearance safety
You’ll verify that the upward venting does not discharge too close to any roof equipment, air intakes, or the edge of the roof where wind can push fumes into the camper. Refer to generator and RV manufacturer recommended clearances.
Cost and value: is it worth it?
You’ll weigh the relatively low cost of an aftermarket exhaust venting system against the clear, practical benefits — fewer fumes at head level, better neighbor relations, and less noise annoyance. For many RV owners the modest expense delivers a strong improvement in daily comfort.
Return on investment perspective
You’ll likely find the ROI in terms of comfort and safety is high, especially if you run the generator frequently or spend time in crowded campgrounds. You’ll also reduce the likelihood of complaints from neighboring campers or park managers.
Who should buy this product
You’ll want this if you regularly run your RV generator, camp in busy campgrounds, or live in the RV full-time. If you rarely use the generator or only use it in very open areas, a venting system may be optional.
Who this is best for
You’ll get the most benefit if you:
- Run A/C or appliances regularly while parked.
- Camp in close quarters or run the generator at night.
- Want a relatively low-effort way to improve air quality around the RV.
Final verdict: practical, safe, and easy to use
You’ll find the RV Generator Exhaust Venting System 44461 provides a practical and relatively low-cost approach to moving exhaust away from living areas and reducing perceived noise. It’s not a universal cure-all — proper fit, installation, and safety practices determine how well it performs — but for many RV owners it’s a very useful addition.
Frequently asked questions (FAQs)
Will the RV Generator Exhaust Venting System 44461 fit my generator?
You’ll need to measure your generator’s exhaust outlet diameter and orientation before buying. If your outlet matches common sizes and faces outward, the product will likely fit; otherwise an adapter or custom solution may be required.
Does this system eliminate carbon monoxide risk?
You’ll understand it reduces the risk of ground-level exposure by directing exhaust upward, but it does not eliminate CO danger. You must still use CO detectors, follow clearances, and adhere to safe operating procedures.
Do I need special tools to install it?
You’ll often be able to install it with basic hand tools, and many buyers report the supplied clamps and adapters make it mostly tool-free. A screwdriver or ratchet and a ladder are commonly all you’ll use.
Will this make my generator silent?
You’ll notice a reduction in perceived noise close to the RV because the exhaust is directed upward, but the generator’s internal mechanical noise remains. For significant quieting, you would need a dedicated muffler or more sophisticated noise-reduction retrofit.
How do I maintain it?
You’ll check clamps and seals regularly, clean soot from external surfaces when needed, and replace worn gaskets or corroded parts. Routine inspection after long trips or seasons of heavy use keeps the system working reliably.
Can I install this on an RV with a low roof height?
You’ll need to ensure there’s sufficient roof clearance and that the exhaust will clear roof-mounted equipment or nearby trees. If the upward extension would be too close to components or the roof-edge, consider alternative routing or consult a professional.
What if I get exhaust smell after installation?
You’ll first check for a loose connection or a misaligned adapter. Tighten clamps, re-seat the part, and re-test; if smell persists, inspect for cracks or gaps, and consider adding high-temperature sealant or contacting the seller.
Is this compatible with factory OEM exhaust systems?
You’ll find compatibility varies; some OEM systems are unique and require manufacturer-specific parts. Measure and compare before buying, and if needed, look for an OEM kit or a custom adapter.
Can I use this permanently, or is it a temporary solution?
You’ll be fine using this as a permanent addition if it’s installed correctly and maintained, but the long-term durability depends on material quality and exposure to elements. For full-time RV living in harsh climates, inspect annually and replace parts as needed.
Where should I buy replacement parts or adapters?
You’ll often find replacement clamps, gaskets, and adapter pieces from RV parts suppliers, the original seller, or aftermarket shops. Keep the part number (44461) handy when searching and verify compatibility.
Closing thoughts and next steps
You’ll be able to decide whether this product fits your needs by measuring your generator outlet, checking roof clearances, and weighing the benefits against alternatives. If you value improved air quality at ground level and a quieter campsite experience, adding the RV Generator Exhaust Venting System 44461 is worth serious consideration — just pair it with good CO monitoring and regular maintenance to keep everything safe.
If you want, tell me your generator model and the outlet dimensions and I’ll help you check compatibility and list the items you’ll need for a smooth installation.
Disclosure: As an Amazon Associate, I earn from qualifying purchases.